Crispy Baked Chimichangas
Introduction
Welcome to the world of crispy baked chimichangas! Today, we are diving into a delightful recipe that brings together the flavors of Mexican cuisine with a crunchy twist. Whether you’re a culinary enthusiast or simply looking to spice up your dinner routine, this recipe is sure to satisfy your taste buds.
Chimichangas are a popular dish known for their crispy exterior and flavorful fillings. What sets this baked version apart is its healthier approach compared to traditional deep-fried chimichangas. By baking instead of frying, you can enjoy all the deliciousness with less guilt.
Originating from the southwestern United States, chimichangas have become a beloved dish across the country. Their versatility allows for a variety of fillings, making them adaptable to different tastes and dietary preferences. Get ready to embark on a culinary journey that combines crunchiness and savory goodness!
Join me as we explore the steps to create these mouthwatering crispy baked chimichangas that are sure to become a favorite in your recipe repertoire.
Why You’ll Love This Recipe
These crispy baked chimichangas offer a delightful combination of textures and flavors that will leave you craving more. The golden, crunchy exterior contrasts beautifully with the warm, savory filling inside, creating a satisfying bite every time.
One of the best features of this recipe is its healthier preparation method. By baking the chimichangas instead of frying them, you can enjoy a crispy finish without the excess oil. This makes it a great option for those looking to indulge in a delicious treat without compromising on their dietary goals.
Additionally, these baked chimichangas are highly customizable. You can experiment with different fillings, from classic shredded chicken and cheese to vegetarian options like black beans and roasted vegetables. Let your creativity shine as you personalize this recipe to suit your preferences.
Whether you’re hosting a casual dinner party or simply craving a comforting meal, these crispy baked chimichangas are the perfect choice. Easy to make, full of flavor, and a crowd-pleaser, this recipe is bound to become a staple in your kitchen.
Ingredients
For the Chimichangas:
– Flour tortillas (burrito size)
– Cooked and shredded chicken
– Shredded cheese (cheddar or Mexican blend)
– Refried beans
– Diced tomatoes
– Chopped onions
– Minced garlic
Optional Ingredient Substitutions:
– For a vegetarian version, substitute the chicken with black beans or tofu
– Experiment with different types of cheese for varied flavors
– Add jalapeños or green chilies for a spicy kick
– Include sliced avocado or guacamole for a creamy finish
Step-by-Step Instructions
1. Prepare the Filling:
In a skillet, sauté the onions and garlic until fragrant. Add the shredded chicken, diced tomatoes, and refried beans. Cook until heated through, then set aside.
2. Assemble the Chimichangas:
Place a spoonful of the filling onto a flour tortilla. Top with shredded cheese and any additional desired toppings. Fold the sides of the tortilla over the filling, then roll it up tightly.
3. Bake the Chimichangas:
Preheat the oven to 400°F (200°C). Place the assembled chimichangas on a baking sheet lined with parchment paper. Lightly brush each chimichanga with oil for a crispy finish.
4. Bake for 20-25 minutes:
Transfer the baking sheet to the oven and bake the chimichangas until they are golden and crispy. Allow them to cool slightly before serving.
5. Serve and Enjoy:
Garnish the chimichangas with fresh cilantro, sour cream, and salsa. Serve hot and enjoy the crunchy goodness!
Expert Tips for Success
– To ensure a crispy texture, place the assembled chimichangas seam-side down on the baking sheet.
– Experiment with different fillings and seasonings to create unique flavor profiles.
– For extra crunch, you can sprinkle a little cheese on the outside of the chimichangas before baking.
– If using flour tortillas, slightly warm them before assembling to make them more pliable.
Variations and Substitutions
Variation 1: Vegetarian Chimichangas
Replace the shredded chicken with a mix of black beans, corn, and diced bell peppers for a delicious vegetarian option.
Variation 2: Seafood Chimichangas
Swap the chicken for cooked shrimp or fish for a flavorful seafood twist. Add a squeeze of lime for a refreshing kick.
Substitution: Gluten-Free Option
Use gluten-free tortillas to make this recipe suitable for those with gluten sensitivities. Ensure all other ingredients are gluten-free as well.
Serving Suggestions
These crispy baked chimichangas are best served hot and fresh out of the oven. Pair them with a side of Mexican rice, guacamole, and a refreshing salad for a complete meal.
For a festive touch, serve the chimichangas with a side of salsa, sour cream, and a sprinkle of fresh cilantro. You can also add a squeeze of lime for an extra burst of flavor.
Don’t forget to complement this dish with a refreshing beverage like a cold glass of horchata or a classic margarita to enhance the dining experience.
FAQs
Q: Can I make ahead and freeze chimichangas?
A: Yes, you can assemble the chimichangas ahead of time, freeze them on a baking sheet until firm, then transfer to a freezer-safe bag. Bake from frozen, adding a few extra minutes to the baking time.
Q: How do I store leftovers?
A: Store any leftover chimichangas in an airtight container in the refrigerator for up to 3 days. Reheat in the oven or microwave until heated through.
Q: Can I use corn tortillas instead of flour tortillas?
A: While traditionally made with flour tortillas, you can certainly use corn tortillas for a different texture and flavor profile. Ensure to warm them up before assembling to prevent cracking.
Final Thoughts
As we conclude our culinary journey into the world of crispy baked chimichangas, I hope this recipe has inspired you to get creative in the kitchen. With its crispy exterior, flavorful fillings, and endless customization options, this dish is a true crowd-pleaser.
Whether you’re a seasoned chef or a beginner cook, making crispy baked chimichangas is a fun and rewarding experience. So gather your ingredients, roll up your sleeves, and embark on a flavorful adventure that will delight your senses and satisfy your cravings.
Remember, cooking is not just about following a recipe—it’s about infusing your personality and passion into every dish you create. So go ahead, try out this recipe, make it your own, and enjoy the delicious results. Happy cooking!
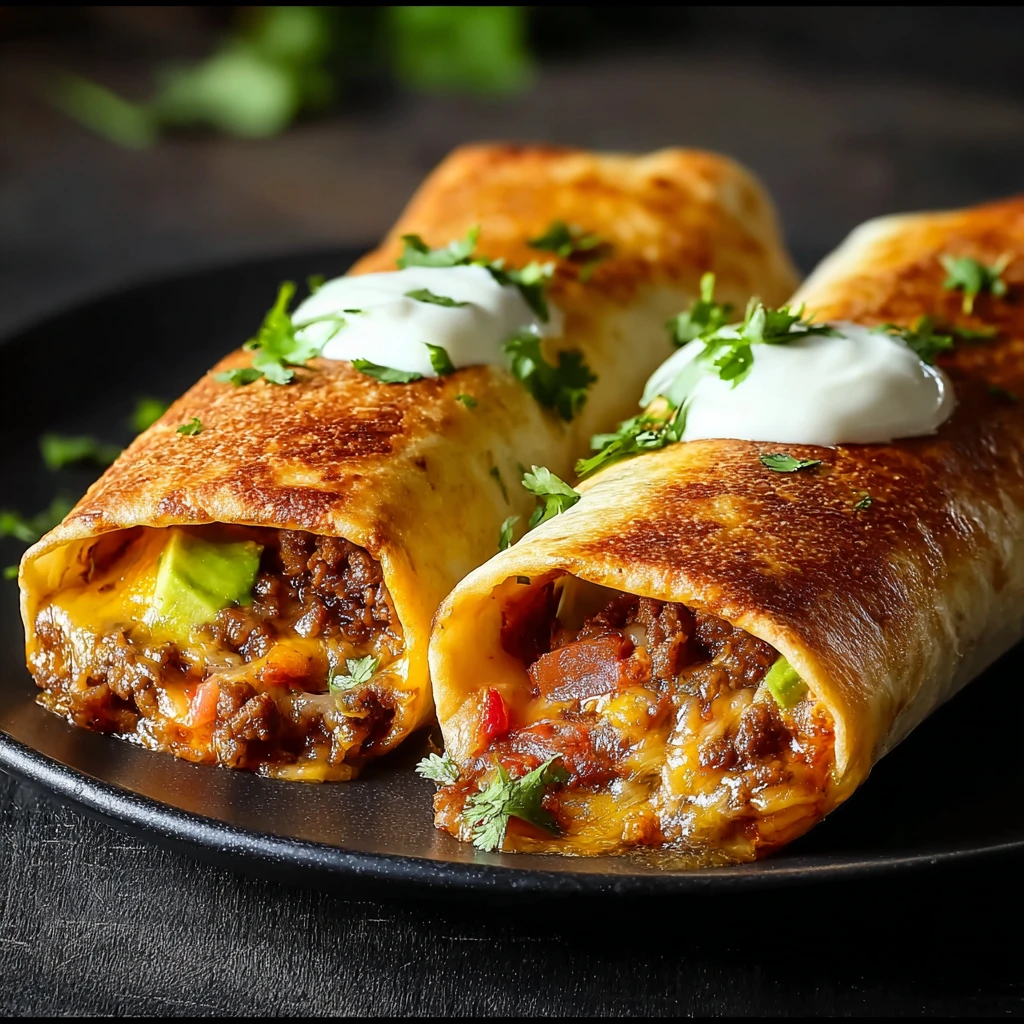
Crispy Baked Chimichangas
Delight in the crispy exterior and savory fillings of these baked chimichangas, a healthier twist on the traditional deep-fried version. Perfect for a casual dinner or a comforting meal, these customizable chimichangas are sure to become a favorite in your kitchen.
Ingredients
- 4 flour tortillas (burrito size)
- 2 cups cooked and shredded chicken
- 1 cup shredded cheese (cheddar or Mexican blend)
- 1 cup refried beans
- 1/2 cup diced tomatoes
- 1/4 cup chopped onions
- 2 cloves minced garlic
- Optional: jalapeños, green chilies, avocado or guacamole for additional toppings
Directions
- In a skillet, sauté onions and garlic. Add shredded chicken, diced tomatoes, and refried beans. Cook until heated through, then set aside.
- Place a spoonful of the filling on a tortilla. Add cheese and desired toppings. Fold the sides over the filling, then roll tightly.
- Preheat the oven to 400°F (200°C). Place chimichangas on a baking sheet lined with parchment paper. Lightly brush with oil.
- Bake for 20-25 minutes until golden and crispy. Allow to cool slightly before serving.
- Garnish with fresh cilantro, sour cream, and salsa. Serve hot and enjoy!