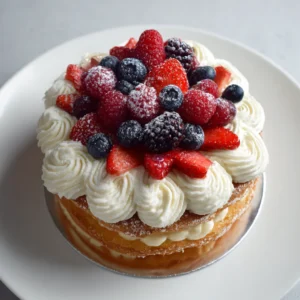
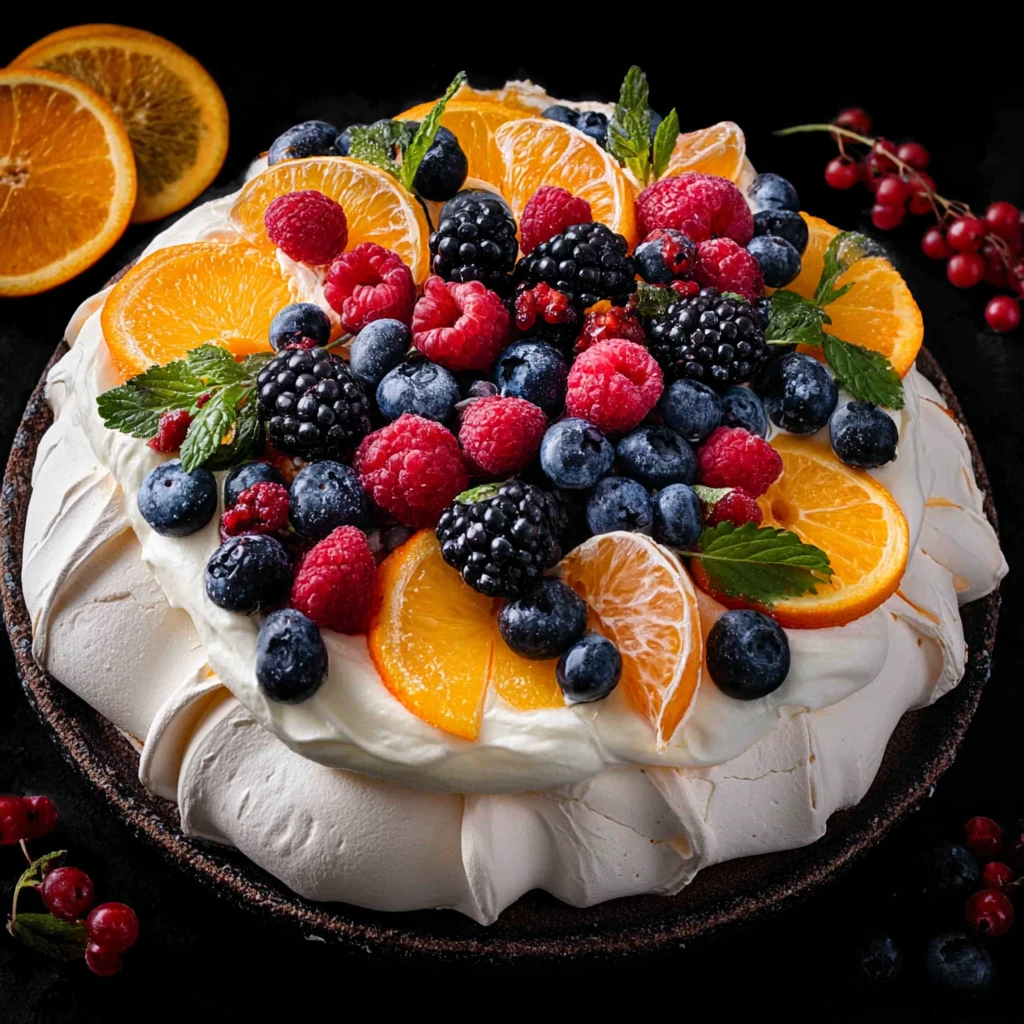
Dream Pavlova
Introduction
Imagine a dessert that is as light as a dream, with a delicate crisp crust that gives way to a soft, fluffy interior. Enter the world of Dream Pavlova, a divine meringue-based dessert that is a true showstopper on any table. This dessert is not only visually stunning but also incredibly delicious, making it a favorite among both home cooks and professional chefs alike.
What sets Dream Pavlova apart is its unique combination of textures and flavors. The crunchy meringue shell contrasts beautifully with the pillowy softness of the whipped cream and the freshness of the fruit toppings. Whether you’re a seasoned baker or a novice in the kitchen, this recipe is sure to impress your guests and leave them craving for more.
Originating from Australia or New Zealand, the exact history of the Pavlova dessert is a topic of debate. Some claim it was named after the Russian ballerina Anna Pavlova, while others argue that it was created in honor of her visit to the region. Regardless of its origins, one thing is certain – the Dream Pavlova has earned its place as a beloved classic in the world of desserts.
Join me on a culinary journey as we delve into the art of creating the perfect Dream Pavlova, from selecting the finest ingredients to mastering the art of baking this ethereal dessert.
Why You’ll Love This Recipe
One of the most appealing aspects of the Dream Pavlova is its versatility. This dessert can be customized to suit any taste preference, whether you prefer a traditional topping of berries or a more exotic combination of tropical fruits. The airy texture of the meringue is a delight to bite into, offering a satisfying crunch that gives way to a melt-in-your-mouth experience.
Moreover, the Dream Pavlova is a gluten-free dessert, making it suitable for those with dietary restrictions. By using natural sweeteners and fresh fruit toppings, you can indulge in this delectable treat guilt-free. Whether you’re hosting a dinner party or simply craving a sweet treat, this recipe is sure to become a staple in your dessert repertoire.
Prepare to be enchanted by the simplicity and elegance of the Dream Pavlova. With just a few basic ingredients and a bit of patience, you can create a dessert that is sure to dazzle your taste buds and leave a lasting impression on your guests.
Get ready to embark on a culinary adventure as we explore the art of making the perfect Dream Pavlova, one step at a time.
Ingredients
To create the perfect Dream Pavlova, you will need the following ingredients:
– 4 large egg whites, at room temperature
– 1 cup granulated sugar
– 1 teaspoon cornstarch
– 1 teaspoon white vinegar
– 1/2 teaspoon vanilla extract
– 1 cup heavy cream, chilled
– Fresh berries (such as strawberries, blueberries, and raspberries) for topping
Optional ingredient substitutions:
– You can use alternative sweeteners like caster sugar or superfine sugar for a smoother meringue texture.
– For a dairy-free version, you can substitute the heavy cream with coconut cream.
– Experiment with different fruit combinations such as kiwi, passion fruit, or mango for a tropical twist.
Now that you have gathered all the necessary ingredients, let’s move on to the step-by-step instructions for creating your very own Dream Pavlova.
Step-by-Step Instructions
1. Preheat the oven to 250°F (120°C) and line a baking sheet with parchment paper.
2. In a clean, dry mixing bowl, beat the egg whites on medium speed until soft peaks form.
3. Gradually add the sugar, one tablespoon at a time, while continuing to beat the egg whites on high speed until stiff, glossy peaks form.
4. Gently fold in the cornstarch, white vinegar, and vanilla extract until well combined.
5. Spoon the meringue onto the prepared baking sheet, shaping it into a round disc with slightly raised edges.
6. Place the baking sheet in the oven and immediately reduce the temperature to 200°F (100°C). Bake for 1.5 hours, then turn off the oven and let the Pavlova cool completely inside the oven.
7. In a separate bowl, whip the chilled heavy cream until soft peaks form. Spread the whipped cream over the cooled Pavlova.
8. Top the Pavlova with fresh berries and serve immediately for the best experience.
Expert Tips for Success
– Ensure that your mixing bowl and beaters are completely clean and free of any grease, as any residue can prevent the egg whites from whipping properly.
– For best results, use room temperature egg whites, as they will whip up faster and create a more stable meringue.
– Be gentle when folding in the additional ingredients to avoid deflating the meringue mixture.
By following these expert tips, you can achieve a perfect Pavlova every time and impress your guests with your baking skills.
Variations and Substitutions
Feel free to get creative with your Dream Pavlova by trying out different variations and substitutions:
– Add a hint of lemon zest to the meringue for a citrusy flavor.
– Swirl in a tablespoon of cocoa powder for a chocolatey twist.
– Drizzle the finished Pavlova with a raspberry coulis or chocolate sauce for an elegant presentation.
Don’t be afraid to experiment with new flavors and textures to make this recipe your own.
Serving Suggestions
To serve the Dream Pavlova in style, consider the following suggestions:
– Garnish the Pavlova with fresh mint leaves for a pop of color.
– Pair the dessert with a glass of sparkling wine or champagne for a touch of elegance.
– Serve the Pavlova alongside a scoop of vanilla ice cream for a decadent treat.
Get creative with your presentation to make this dessert the centerpiece of your next gathering.
FAQs
Q: Can I make the Pavlova in advance?
A: While it’s best to assemble the Pavlova just before serving, you can prepare the components ahead of time and assemble them right before serving to maintain the texture and freshness of the dessert.
Q: How do I store leftover Pavlova?
A: Leftover Pavlova can be stored in an airtight container at room temperature for up to 2 days. However, the meringue may soften over time, so it’s best enjoyed fresh.
Q: Can I freeze Pavlova?
A: It is not recommended to freeze Pavlova, as the meringue may become soggy upon thawing. It’s best to enjoy this dessert fresh for the best experience.
With these FAQs, you’ll be well-equipped to tackle any questions that may arise while making your Dream Pavlova.
Final Thoughts
As you embark on the journey of creating your very own Dream Pavlova, remember that the key ingredients are patience and passion. This ethereal dessert is a true labor of love, but the end result is well worth the effort.
Whether you’re baking for a special occasion or simply indulging your sweet tooth, the Dream Pavlova is sure to captivate your senses and leave you craving more. So roll up your sleeves, preheat your oven, and get ready to experience the magic of this heavenly dessert.
Share your Pavlova creations with friends and family, and watch as their eyes light up with delight. Let the Dream Pavlova become a staple in your culinary repertoire, bringing joy and sweetness to every occasion.
Dream Pavlova
Dream Pavlova is a divine meringue-based dessert with a delicate crisp crust that gives way to a soft, fluffy interior. Topped with fresh berries and whipped cream, this dessert is visually stunning and incredibly delicious, making it a favorite among both home cooks and professional chefs.
Ingredients
- 4 large egg whites, at room temperature
- 1 cup granulated sugar
- 1 teaspoon cornstarch
- 1 teaspoon white vinegar
- 1/2 teaspoon vanilla extract
- 1 cup heavy cream, chilled
- Fresh berries (such as strawberries, blueberries, and raspberries) for topping
Directions
- Preheat the oven to 250°F (120°C) and line a baking sheet with parchment paper.
- In a clean, dry mixing bowl, beat the egg whites on medium speed until soft peaks form.
- Gradually add the sugar, one tablespoon at a time, while continuing to beat the egg whites on high speed until stiff, glossy peaks form.
- Gently fold in the cornstarch, white vinegar, and vanilla extract until well combined.
- Spoon the meringue onto the prepared baking sheet, shaping it into a round disc with slightly raised edges.
- Place the baking sheet in the oven and immediately reduce the temperature to 200°F (100°C). Bake for 1.5 hours, then turn off the oven and let the Pavlova cool completely inside the oven.
- In a separate bowl, whip the chilled heavy cream until soft peaks form. Spread the whipped cream over the cooled Pavlova.
- Top the Pavlova with fresh berries and serve immediately for the best experience.