Molten Chocolate Lava Cookies: 12 Amazing Gooey Secrets
Introduction
Are you ready to embark on a decadent journey into the world of molten chocolate lava cookies? Picture this: warm, gooey chocolate oozing out of a perfectly baked cookie, creating a symphony of flavors in every bite. In this article, we will unravel the secrets behind creating the ultimate molten chocolate lava cookies that will leave you craving for more. Whether you’re a baking enthusiast or a dessert connoisseur, this recipe is sure to impress your taste buds and elevate your culinary skills.
What makes molten chocolate lava cookies so special is their ability to surprise and delight with each mouthful. The contrast between the crisp cookie exterior and the molten chocolate center is a sensory delight that never fails to amaze. These cookies are not just a dessert; they are an experience, a moment of pure indulgence that can brighten even the gloomiest of days.
Throughout history, chocolate has been revered for its luxurious and comforting qualities. By mastering the art of making molten chocolate lava cookies, you are tapping into a tradition of culinary excellence that spans centuries. The rich, velvety chocolate combined with the perfect cookie texture creates a harmonious blend that is simply irresistible.
So, roll up your sleeves, preheat your oven, and get ready to dive into the world of molten chocolate lava cookies. Let’s unlock the secrets to creating these heavenly treats that are sure to become a staple in your dessert repertoire.
Why You’ll Love This Recipe
Prepare to be amazed by the simplicity and decadence of this molten chocolate lava cookies recipe. These cookies are not just your average sweet treat; they are a celebration of all things chocolatey and delightful. With a gooey center that melts in your mouth and a hint of crunch in every bite, these cookies offer a sensory experience like no other.
For those with dietary restrictions, fear not! This recipe can easily be adapted to suit various needs, whether you’re looking for a gluten-free option or a vegan-friendly alternative. The versatility of these molten chocolate lava cookies makes them a crowd-pleaser at any gathering, ensuring that everyone can indulge in their irresistible charm.
One of the best features of this recipe is its simplicity and ease of preparation. Even beginners in the kitchen can master the art of making molten chocolate lava cookies with these straightforward instructions. From the first mix of ingredients to the final decadent bite, you’ll be amazed at how effortless and rewarding the baking process can be.
Get ready to impress your friends and family with a dessert that exudes elegance and sophistication. These molten chocolate lava cookies are perfect for special occasions, dinner parties, or simply as a delightful treat to brighten up your day. Once you experience the magic of these cookies, you’ll understand why they hold a special place in the hearts of dessert lovers everywhere.
Ingredients
Before you embark on your molten chocolate lava cookie baking adventure, gather the following ingredients:
– High-quality chocolate (pick the best chocolate for molten lava cookies)
– Flour (gluten-free option available for those with dietary restrictions)
– Sugar (or sugar-free alternative for a guilt-free indulgence)
– Butter or vegan butter for a dairy-free version
– Eggs (or egg substitutes for a vegan twist)
– Vanilla extract for a touch of aromatic sweetness
– Baking powder and salt for the perfect cookie texture
Feel free to explore different variations of these ingredients to suit your taste preferences and dietary needs. The key to a successful batch of molten chocolate lava cookies lies in using high-quality ingredients that will elevate the flavors and textures of your final creation.
Step-by-Step Instructions
Let’s dive into the step-by-step process of creating your very own batch of molten chocolate lava cookies:
1. Start by melting the chocolate in a heatproof bowl over a pot of simmering water, ensuring it melts smoothly without burning.
2. In a separate bowl, combine the flour, sugar, baking powder, and salt, mixing well to ensure even distribution of ingredients.
3. In another bowl, whisk together the eggs and vanilla extract until light and frothy, then add the melted chocolate and butter, stirring until well combined.
4. Gradually fold the dry ingredients into the wet mixture, being careful not to overmix, as this can affect the texture of your cookies.
5. Once the cookie dough is ready, spoon it into individual molds or onto a baking sheet, ensuring each portion is evenly distributed.
6. Bake the cookies in a preheated oven until the edges are set but the centers are still soft and gooey, creating that signature molten lava effect.
7. Remove the cookies from the oven and let them cool slightly before serving. For an extra indulgent touch, pair them with a scoop of your favorite ice cream or a drizzle of caramel sauce.
Expert Tips for Success
To ensure your molten chocolate lava cookies turn out perfectly every time, keep these expert tips in mind:
– Use high-quality chocolate with at least 70% cocoa content for a rich and intense flavor profile.
– Don’t overbake the cookies; the centers should be slightly underbaked to achieve that gooey lava effect.
– Experiment with different types of chocolate and flavor additions, such as sea salt or espresso powder, to create unique variations of this classic recipe.
– Allow the cookie dough to rest in the refrigerator for at least 30 minutes before baking to enhance the flavors and textures of the final product.
Variations and Substitutions
Looking to put a creative spin on your molten chocolate lava cookies? Here are some variations and substitutions to consider:
– Swap out the traditional chocolate filling for a white chocolate or caramel center for a twist on the classic recipe.
– Incorporate chopped nuts or dried fruits into the cookie dough for added texture and flavor complexity.
– Experiment with different types of flour, such as almond flour or coconut flour, for a gluten-free alternative with a unique taste profile.
– For a vegan-friendly version, replace the eggs with flax eggs or aquafaba to achieve the same moist and gooey texture.
Serving Suggestions
When it comes to serving your molten chocolate lava cookies, the options are endless:
– Pair them with a scoop of vanilla ice cream and a drizzle of hot fudge sauce for a decadent dessert experience.
– Serve them warm with a dusting of powdered sugar and a side of fresh berries for a touch of brightness and acidity.
– Accompany them with a glass of dessert wine or a cup of freshly brewed coffee to enhance the richness of the chocolate flavors.
– Get creative with your presentation by stacking the cookies on a dessert platter and garnishing them with edible flowers or chocolate shavings for an elegant touch.
FAQs
Here are some common questions you may have about making molten chocolate lava cookies:
Q: Can I prepare the cookie dough in advance and bake it later?
A: Yes, you can refrigerate the cookie dough for up to 24 hours before baking to enhance the flavors and textures of the cookies.
Q: How can I store leftover molten chocolate lava cookies?
A: Store the cooled cookies in an airtight container at room temperature for up to 3 days or in the freezer for longer-term storage.
Q: Can I reheat molten chocolate lava cookies?
A: To reheat leftover cookies, place them in a preheated oven for a few minutes until the centers are warm and gooey again.
Q: Can I make mini versions of molten chocolate lava cookies?
A: Absolutely! Simply adjust the size of the cookie dough portions and reduce the baking time accordingly to create adorable mini lava cookies.
Final Thoughts
As you reach the end of this molten chocolate lava cookies journey, we hope you’ve gained valuable insights and inspiration to create your own delightful batch of these indulgent treats. From the first crack of the cookie to the oozing chocolate center, every bite is a testament to the magic of baking and the joy of savoring sweet moments.
Remember, the key to perfecting molten chocolate lava cookies lies in patience, attention to detail, and a sprinkle of creativity. Whether you’re a seasoned baker or a novice in the kitchen, these cookies offer a rewarding experience that will leave you craving more.
So, gather your ingredients, preheat your oven, and unleash your inner pastry chef as you embark on the delightful adventure of making molten chocolate lava cookies. With each batch you bake, you’re not just creating a dessert; you’re crafting memories and moments of pure indulgence that will linger long after the last crumb is gone.
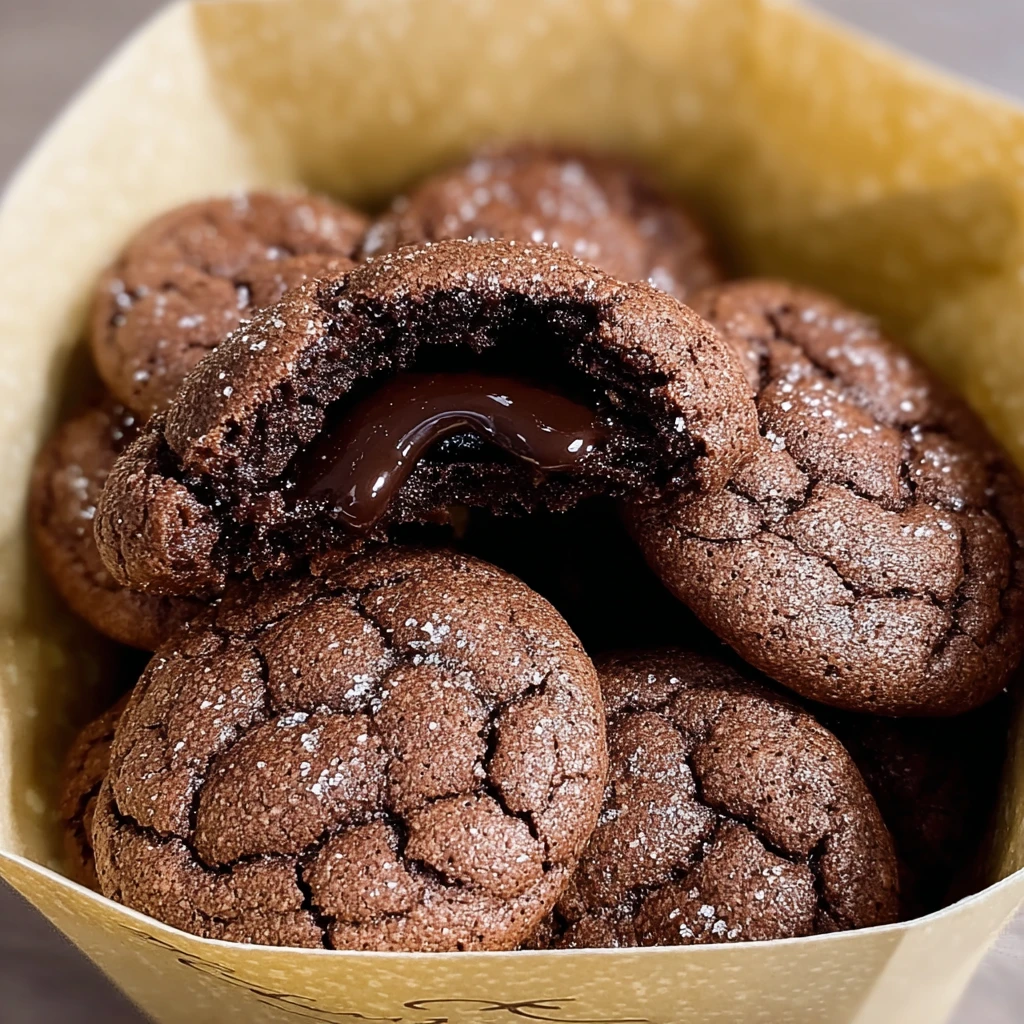
Molten Chocolate Lava Cookies: 12 Amazing Gooey Secrets
Indulge in the decadent and delightful world of molten chocolate lava cookies with gooey chocolate centers and crisp exteriors. These cookies are a sensory delight, perfect for impressing guests or satisfying your sweet cravings.
Ingredients
- High-quality chocolate
- Flour
- Sugar
- Butter
- Eggs
- Vanilla extract
- Baking powder
- Salt
Directions
- Start by melting the chocolate in a heatproof bowl over a pot of simmering water.
- Combine flour, sugar, baking powder, and salt in a separate bowl.
- Whisk eggs and vanilla extract, then add melted chocolate and butter.
- Gradually fold dry ingredients into the wet mixture without overmixing.
- Spoon dough into molds or onto a baking sheet.
- Bake until edges are set but centers are still soft and gooey.
- Let cool slightly before serving.