

Fresh and Home Made Blackberry Jam – Easy and Tasty
Making your own jam at home can be a rewarding experience, especially when it comes to creating delicious Fresh and Homemade Blackberry Jam. This easy blackberry jam recipe allows you to capture the sweet and tangy flavors of fresh blackberries in a jar, perfect for breakfast spreads, dessert toppings, or simply enjoying on toast. Let’s dive into how to make blackberry jam that bursts with flavor and elevates any meal! As you prepare this delightful treat, you’ll find that the process is not only satisfying but also fills your kitchen with the wonderful aroma of cooking berries.
Ingredients
- Fresh Blackberries: 4 cups, rinsed and stems removed. Choose plump, dark purple-black blackberries, as they indicate ripeness and sweetness, which is crucial for the best flavor in your jam. Make sure to select berries that are firm and free from blemishes for the most successful outcome.
- Sugar: 4 cups (adjust based on sweetness preference). Granulated sugar is preferred, but you may also use cane sugar for a more natural sweetness. It’s important to measure correctly, as sugar not only adds sweetness but also helps with the jam’s setting.
- Fresh Lemon Juice: 1/4 cup (about 2 lemons). Freshly squeezed lemon juice adds acidity that balances the sweetness and enhances the berry flavor. The acidity is vital for achieving the perfect consistency and preserving the jam.
- Water: 1/2 cup. This helps to dissolve the sugar and allows for proper cooking of the jam. Using filtered water can improve the overall taste of the jam.
- Optional: 1/2 teaspoon vanilla extract or cinnamon for added flavor. These ingredients can provide a warm undertone that complements the blackberries beautifully, enhancing the overall aroma and taste profile of your Fresh and Homemade Blackberry Jam.
Note: For the best results, use ripe, juicy blackberries. If you can’t find fresh blackberries, frozen blackberries can be substituted, but ensure they are without added sugar. Thaw them before use and drain any excess liquid to maintain the right consistency in your jam.
Steps / Instructions
- In a large bowl, mash the fresh blackberries gently with a potato masher or fork, leaving some chunks for texture. This will create a delightful consistency in your jam, combining smoothness with small berry pieces. Be careful not to over-mash, as some whole berries can provide lovely bursts of flavor.
- Transfer the mashed blackberries to a large pot and add sugar, fresh lemon juice, and water. Stir well to combine. Ensure that the ingredients are evenly mixed for a consistent flavor throughout the jam. A wooden spoon works well for mixing, as it allows you to scrape the bottom of the pot effectively.
- Cook the mixture over medium heat, stirring frequently until the sugar has completely dissolved—about 5 minutes. Watch for a clear syrup forming as the sugar integrates fully with the blackberries. Take care to keep the mixture from scorching on the bottom of the pot.
- Increase the heat to medium-high, bringing the mixture to a rolling boil. Allow it to boil vigorously for 10-15 minutes, stirring frequently. You will know it’s ready when it thickens and reaches a temperature of 220°F (105°C) on a candy thermometer. The bubbling surface should look thick and glossy, signaling that the jam is nearing its final stage.
- To check for doneness, place a small spoonful of the jam on a chilled plate. Let it sit for a minute, then run your finger through it. If it holds its shape and doesn’t run, it’s ready. This step is essential to ensure your jam has the correct consistency. If it seems too runny, continue cooking for a few more minutes and retest.
- Remove the pot from heat and let it cool for about 10 minutes. If desired, stir in vanilla extract or cinnamon at this stage to infuse those flavors into the jam. Stirring gently can help to distribute these flavors evenly throughout the mixture.
- Carefully ladle the hot jam into sterilized jars, leaving about 1/4-inch headspace at the top. Wipe the rims of the jars with a clean cloth to ensure a good seal, which is critical for long-term storage and preservation. This step prevents contamination and helps the lids seal properly.
- Seal the jars with lids and process them in a boiling water bath for 10 minutes to ensure they are preserved properly. This step will help eliminate any bacteria and create a vacuum seal, essential for keeping your Fresh and Homemade Blackberry Jam safe for future enjoyment.
- Remove the jars from the water bath and let them cool completely on a clean towel or cooling rack. You should hear a “pop” as the jars seal, indicating they are properly preserved. Ensure that the jars are spaced apart to allow for airflow during cooling.
Tips & Tricks
To ensure your Fresh and Homemade Blackberry Jam turns out just right, here are some practical tips: Check out our related guide for more tips.
- For a quicker version, you can explore no pectin blackberry jam methods, which require less cooking time and are just as tasty. This can be a great option if you’re short on time, while still delivering fabulous flavor.
- Store your jam in a cool, dark place. Once opened, refrigerate and consume within a few weeks for the best flavor. Consider labeling your jars with the date opened to keep track of freshness.
- Consider making easy homemade gifts by preparing small jars of jam to share with friends and family. Personalize the jars with ribbons or labels for a special touch that adds a heartfelt element to your gifts.
- To avoid common mistakes like burning the jam, stir frequently and monitor the heat closely. If the mixture begins to bubble too aggressively, reduce the heat slightly to maintain a gentle boil, which is ideal for even cooking.
- If planning to make a larger batch, adjust the ingredients while maintaining the same proportions. Doubling or tripling the recipe can save time and give you more jam to enjoy! It’s a great way to ensure you have plenty for yourself and to share.
Variations
Enhance your blackberry jam experience with these variations:
- Experiment with different fruit preserve variations by combining blackberries with raspberries or strawberries for a mixed berry jam. This can create a delightful flavor profile that is uniquely yours and offers a refreshing twist.
- For a gourmet twist, add herbs like rosemary or basil for unique flavor profiles. These herbs can lend an earthy freshness that complements the sweetness of the blackberries wonderfully, making your jam stand out.
- Try using coconut sugar or honey instead of white sugar for a different sweetness level. These natural sweeteners can also add a hint of caramel flavor to your jam, enriching the overall taste.
- If you’re looking for a vegan option, stick to the basic ingredients as this recipe is naturally vegan. Just be sure to check any sweeteners you choose to use for animal products to maintain that dietary preference.
Serving Suggestions
Your Fresh and Homemade Blackberry Jam can be served in various delightful ways:
- Spread it generously on toast or bagels for a delicious breakfast spread. The contrast of warm bread and cool jam creates a delightful sensory experience, making for the perfect start to your day.
- Use it as a topping on pancakes or waffles for an elevated brunch experience. Consider adding a dollop of whipped cream or yogurt for an indulgent treat that brings comfort and joy to your table.
- Pair it with cheese for a gourmet appetizer—think creamy brie or tangy goat cheese. The combination of sweet and savory is sure to impress your guests, creating a stunning cheese board.
- Incorporate it into desserts like cheesecake or ice cream for added flavor depth. A spoonful swirled into vanilla ice cream can create a refreshing summer dessert that everyone will love.
Now that you have the tools and tips needed to create Fresh and Homemade Blackberry Jam, you can enjoy the vibrant taste of summer all year long. For more delicious recipes, check out this juicy steak recipe to complement your delightful jam treats!
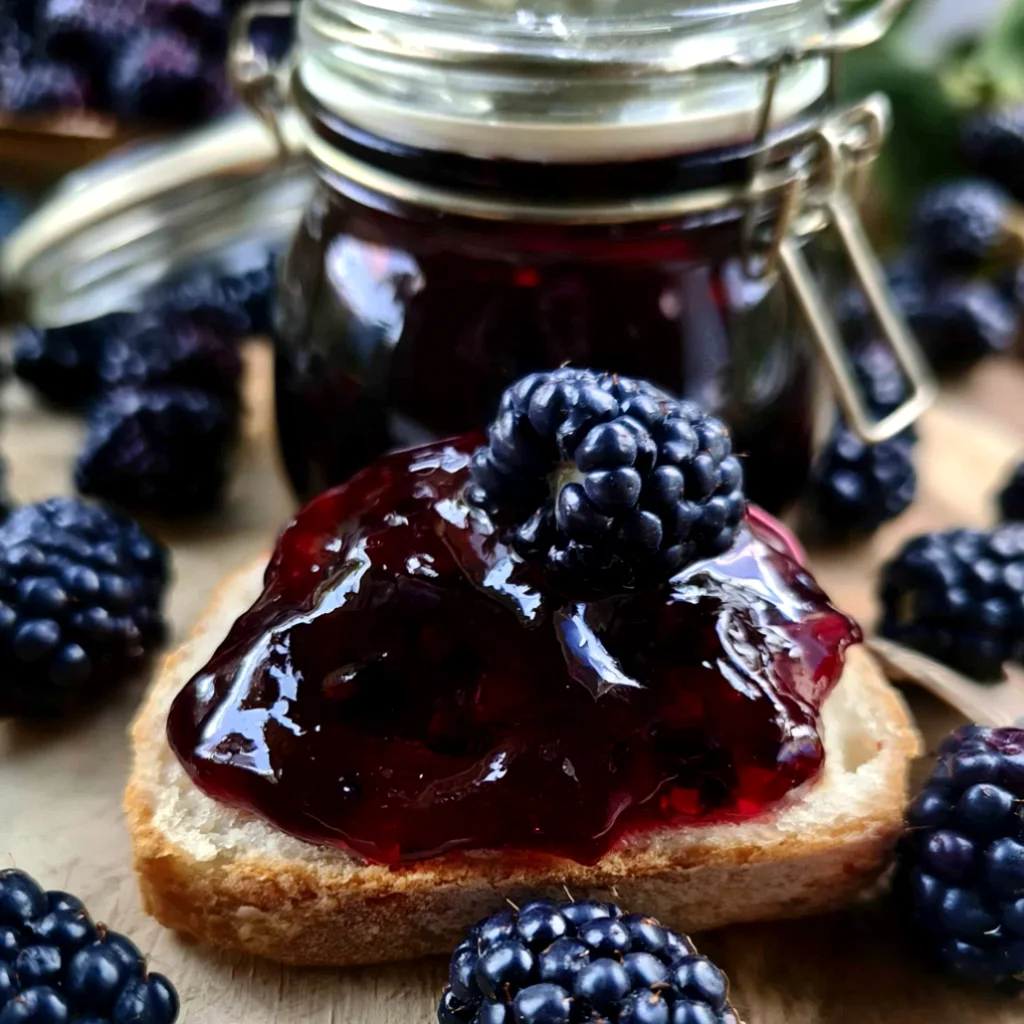
Fresh and Homemade Blackberry Jam
This easy blackberry jam recipe allows you to capture the sweet and tangy flavors of fresh blackberries in a jar, perfect for breakfast spreads, dessert toppings, or simply enjoying on toast.
Ingredients
- 4 cups fresh blackberries, rinsed and stems removed
- 4 cups granulated sugar (adjust based on sweetness preference)
- 1/4 cup fresh lemon juice (about 2 lemons)
- 1/2 cup water
- 1/2 teaspoon vanilla extract or cinnamon (optional)
Directions
In a large bowl, mash the fresh blackberries gently with a potato masher or fork, leaving some chunks for texture.
Transfer the mashed blackberries to a large pot and add sugar, fresh lemon juice, and water. Stir well to combine.
Cook the mixture over medium heat, stirring frequently until the sugar has completely dissolved—about 5 minutes.
Increase the heat to medium-high, bringing the mixture to a rolling boil. Allow it to boil vigorously for 10-15 minutes, stirring frequently.
To check for doneness, place a small spoonful of the jam on a chilled plate. Let it sit for a minute, then run your finger through it. If it holds its shape, it’s ready.
Remove the pot from heat and let it cool for about 10 minutes. If desired, stir in vanilla extract or cinnamon.
Carefully ladle the hot jam into sterilized jars, leaving about 1/4-inch headspace at the top.
Seal the jars with lids and process them in a boiling water bath for 10 minutes.
Remove the jars from the water bath and let them cool completely on a clean towel or cooling rack.
Recipe Reviews
- ★★★★★
Excellent recipe!
Leave a Reply
Your email address will not be published. Required fields are marked *




Excellent recipe!